How to generate document in SAP Successfactors.
Introduction
Companies seek effective ways to create, manage, and segregate a variety of documents, from various departments (like sales, finance, logistics, HR letters, and legal contracts), especially in this rapidly evolving workplace of today. Document generation in SAP SuccessFactors is a persuasive tool that is becoming popular. The tool has the capability that enhances automation, accelerates workflows, and ensures consistency in a Human-focused process, which helps transform how HR teams and other departments generate documents.
Key takeaways:
- It is necessary to enable document generation.Make sure your system has the Document Generation feature enabled through Provisioning or Upgrade Centre.
- Templates must be predefined, Templates Must Be Properly Configured
- Custom Fields Can Be Mapped.
- It supports multiple languages for document generation.
- Ensure Data Privacy and Role-Based Visibility by Restricting access only for authorised.
Of course, Successfactors is already prevalent among many organizations, but the document generation feature is a lesser-known or lesser-used one. However, it is still a core feature of Successfactors and comes with various advantages.
If you want to explore a tool for a document that generates or updates automatically and interactively, check out our blog on Dynamic Document Generation.
Key advantages
Time and Labor Saving: as the document generation is automated, it reduces manual effort and allows the users to create as many documents required in less time. This decreases the processing time for routine paperworks.
Reliability and Factuality: using standard templates guarantees every document follows the same pattern and structure, which minimizes the risk of mistakes and supports or organizational branding.
Cost reduction: by automating document generation workflows, companies realize significant cost savings, as it reduces the cost of manual paper based methods upto 60%.
Regulatory alignment and security: the workflow provides audit security, department based access and management policies that helps companies maintain their Policy adherence.
Integrated workflow and Digital evolution: the tools of document generation integrate with SAP successtators, allowing management of HR to have documents under one system, This provides Cloud-based processes (automated processes) and enables full end-to-end digital processes.
Curious about how to simplify creating bank statements or financial reports, well check out our blog to create personalized financial documents. Click on personalized financial documents.
Use cases
Ever wondered where document generation can be used? No, not just HR documentation. Document generation plays a key role across several other business functions. The use cases range from invoicing to contracts, reports, and compliance documentation
There are countless uses for generating documents in bulk:
In the education sector, users generate personalized certificates, report cards, or letters to parents. Governments and NGOs send out official letters to citizens.
Many businesses automate invoice creation, contract generation, and so much more.
Freelancers use it to prepare reports, feedback forms, proposals, invoices, and more.
The tool offers significant advantages and makes our lives easy across various use cases, but it also comes with challenges. Now let’s see what are the limitations that come with generating documents using Successfactors.
Want to know how businesses can go beyond by using basic software tools in salesforce, check out this blog to slick ultimate guide to salesforce document generation.
Limitations
Bulk Document Processor: there is a 500 limit of employees set in every organisation and if the limit exceeds, you cannot attempt to generate more than 500 documents in a single process, if attempted it will fail and show error.
Unresolved placeholders: A major limitation for users would be the unresolved placeholders, what this means is that there are only three instances where any unresolved placeholder in the document would be displayed or informed to the user. If there are more than three, the system cannot display which placeholders have not been mapped to data fields. Instead it displays the message “There are 5 unresolved placeholders.” This inconveniences the user and leads to manual intervention.
Template Visibility: there are many templates available, during the onboarding and onboarding the templates only 100 templates are visible at once. Although there could be more templates to be uploaded. Templates beyond the visibility have to be searched by name, ID, category type.
Picture size restrictions: the size of the image size should not exceed 800×1200 px or 1200×1200 px, if the image size exceeds more than this, it will show error or fail to document.
If you’re looking to scale your document workflows, check out our blog on top 3 document generation software for Salesforce.
How to generate a document in SAP SuccessFactors:
Steps to Enable Document Generation in SuccessFactors
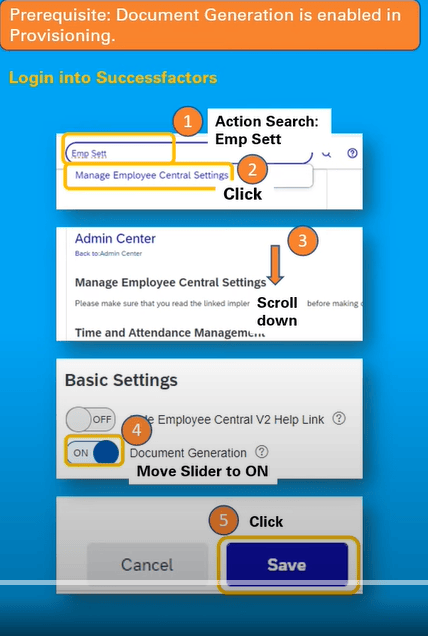
Step 1: First, sign in to SuccessFactors. Get into your SAP SuccessFactors environment.
Step 2: Navigate to the Employee Central Settings
Enter Emp Sett in the Action Search bar.
Select “Manage Employee Central Settings.”
Step 3: Scroll Down
Navigate to the Basic Settings section under Manage Employee Central Settings in the Admin Center.
Step 4: Make Document Generation Active
Find the toggle for Document Generation, and slide the slider to the ON position
Step 5: Save the Configuration. To make your changes take effect, click the Save button.
Steps to Create a New Document Generation Template in SAP SuccessFactors
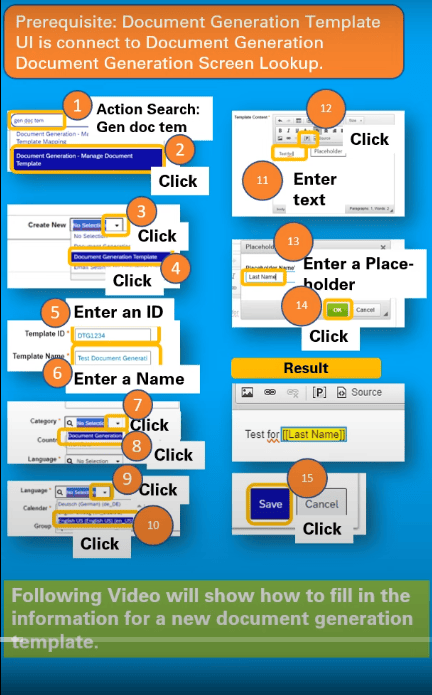
Step 1: Management of Access Templates
Enter “Gen doc tem” in the Action Search bar.
To manage the document template, click Document Generation.
Step 2: Get a New Template Started
Press the “Create New” (+) button.
Choose Document Generation Template from the dropdown menu.
Step 3: Provide Basic Information
In the Template ID field, type an ID (DG1234, for example).
Give the template a name (such as Test Document Generation).
Step 4: Define Template Attributes, Choose a Category (from the dropdown menu).
Select a nation (if necessary)
Choose a Language
Select a Calendar (optional)
Step 5: Include Content from the Template
Enter the text you want (e.g., Test for) in the template editor. To add a placeholder, click the {} icon.
Step 6: Choose the placeholder (last name, for example) or insert a placeholder type.
Press OK.
Step 7: Save the Template
After reviewing the content, click the Save button.
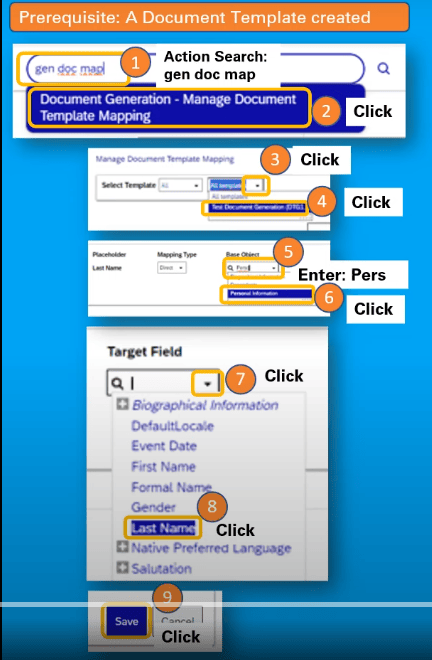
Steps to Map Fields in a Document Generation Template
Step 1: Launch the Template Mapping Tool.
Enter “gen doc map” in the Action Search bar.
To manage document template mapping, select Document Generation.
Step 2: Pick the Template
To choose your template (such as Test Document Generation), click the dropdown.
Step 3: Map a Placeholder, Locate the Mapping Type and Base Object fields in the Placeholder column (such as Last Name).
Put in: Pers
From the list, choose Personal Information.
Step 4: Selecting the Target Field
In the section on the target field:
To view the Biographical Information, click the folder.
Click on Last Name after scrolling or searching.
Step 5: Save the mapping. Now, click the Save button after the placeholder has been properly mapped.
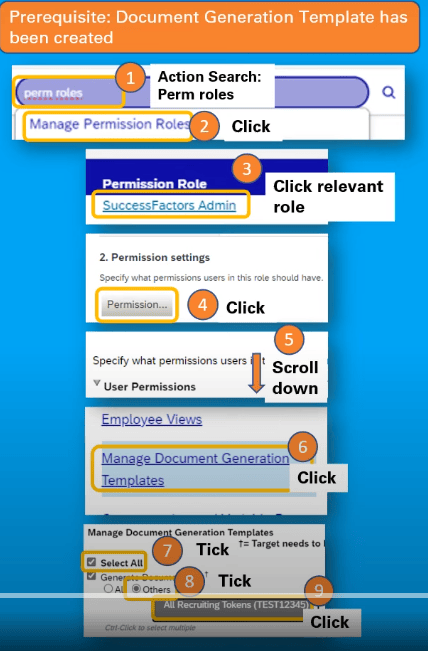
Steps to Assign Document Template Access in SAP SuccessFactors
Step 1: Open the permission roles.
Enter “Perm roles” in the Action Search bar.
Select “Manage Permission Roles.”
Step 2: Select the Proper Position
Select the appropriate permission role, such as SuccessFactors Admin.
Step 3: Modify Permissions. In the Permission Settings section, click the Permission… button.
Step 4: Navigate to User Permissions. To access the User Permissions section, scroll down.
Step 5: Turn on Template Management
Select “Manage Document Generation Templates.”
Step 6: Grant Access to Particular Templates
In the settings for permissions:
Check the “Select All” box.
Select the “Generate Document” checkbox.
Choose the necessary template, such as All Recruiting Tokens (TEST12345).
Step 7: Conserve
To apply these permissions, click the Save button.
Importance of Publishing Permissions After Editing – Document Generation in SAP SuccessFactors
Editing permissions is a common task, when working with document generation. It grants access to particular templates or even in the case of delegating roles for generating the documents. However only editing is not enough, to make these changes useful, you must publish permissions after editing.
Why publish permission?
There are many positive aspects for publishing permissions
- Changes remain inactive until you publish
- Avoids access issues
- Assures safety
- Ensures real time access control
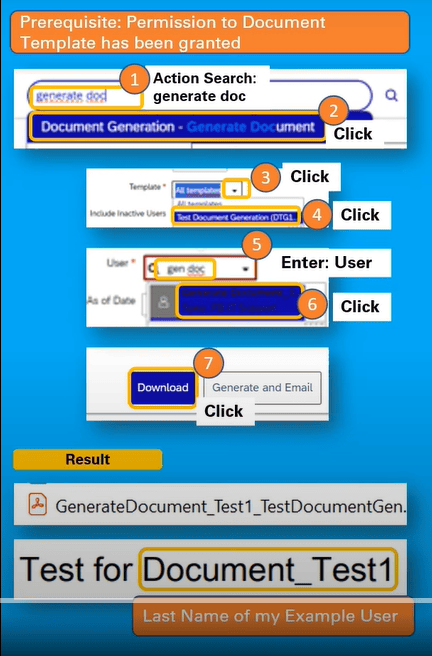
Steps to Generate a Document in SAP SuccessFactors
Step 1: Use the Document Generation Tool
Enter “generate doc” in the Action Search bar.
Select the “Generate Document” option.
Step 2: Choose the Template for the Document
Click to expand the Template dropdown menu.
Choose a template, such as Test Document Generation (DTG1).
Step 3: Choose the User
Enter the user’s name or ID (gen doc, for example) in the User field. From the dropdown list, select the appropriate user.
Step 4: Produce the Paper
Press the “Download” button.
(Alternatively, if email configuration is enabled, you can select Generate and Email.)
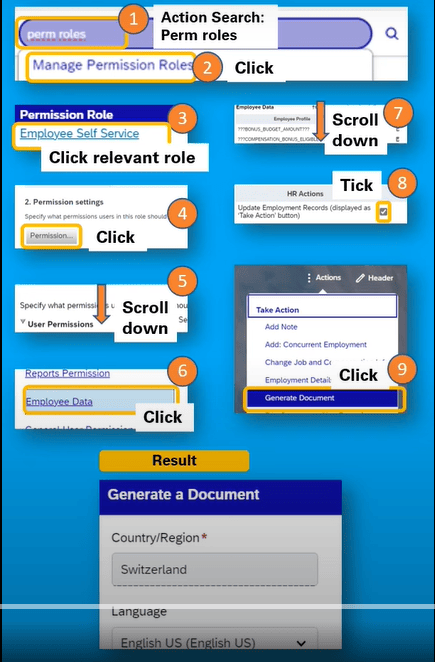
Steps to Enable “Generate Document” Button in Employee Profile (Self-Service Access)
Step 1: Launch Manage Permission Roles.
Enter “Perm roles” in the Action Search bar.
Select “Manage Permission Roles.”
Step 2: Select the Role of Employee
Select the appropriate role (e.g., Employee Self Service).
Step 3: Modify Permission Configurations
Under Permission Settings, select the Permission… button.
Step 4: Locate User Permissions by scrolling down.
Navigate through the User Permissions area.
Step 5: Provide Employee Data Access
Select Employee Data.
Step 6: Navigate to HR Actions
Locate HR Actions by scrolling down.
Step 7: Turn on “Update Employment Records.” Mark the permission box:
Update Employment Records (the “Take Action” button will appear)
Step 8: Save the Permission Role.
Step 9: Examine the employee profile
Visit the profile of an employee.
Select “Take Action” from the drop-down menu. Select “Generate Document.”
These methods given below are the advanced-level documentation that will be helpful.
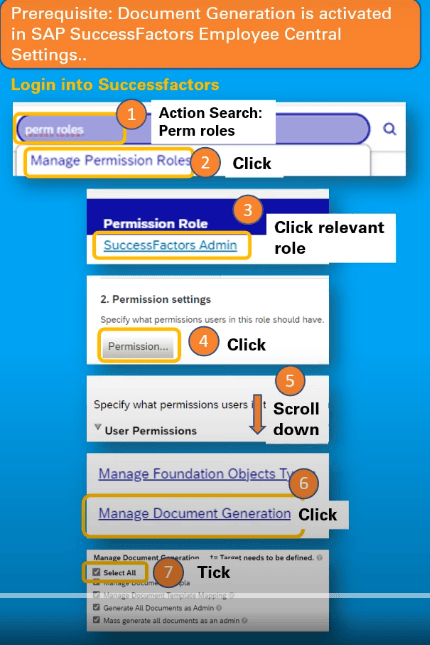
Steps to Assign Document Generation Permissions in SuccessFactors
Step 1: Launch Manage Permission Roles.
Enter “Perm roles” in the Action Search bar.
Select “Manage Permission Roles.”
Step 2: Choose a Permission Role in step two
Click on the appropriate role (such as SuccessFactors Admin) from the list of roles.
Step 3: Modify Permissions
Click the Permission… button under Permission Settings on the role screen that has been selected.
Step 4: Locate User Permissions by scrolling down.
Navigate to the User Permissions section by scrolling down the permission settings page.
Step 5: Find “Manage Document Generation” and click on it.
Locate and select “Manage Document Generation” under User Permissions.
Step 6: Turn on Permission
To enable Document Generation permissions, check the box.
Among the options are:
Create Every Document, Create All Documents as Administrator (if required)
Step 7: Preserve the role
Once the permissions have been checked
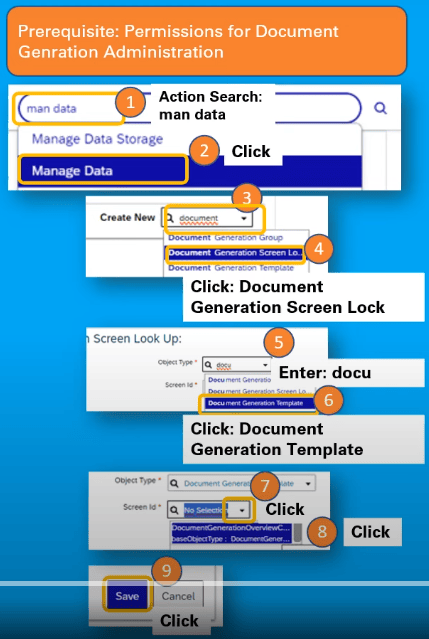
Steps to Configure Document Generation Settings in SuccessFactors
Step 1: Launch Manage Data
Enter “man data” in the Action Search bar.
Select “Manage Data.”
Step 2: Choose the Object for Document Generation
Enter the document in the Create New dropdown.
Choose the following from the dropdown menu:
Screen Lock for Document Generation (first)
Step 3: Configure Screen Lock
Enter docu in the Search Screen Look Up field.
From the list, choose the Document Generation Template.
Step 4: Assign View Permissions in Step Four
Choose the object type in the Object Type field:
Permission for DocumentGenerationView
Next, select DocumentGenerationTemplate in the Base Object Type field.
Step 5: Save Configuration. To apply the settings, click the Save button.
FYI: Some of the names of existing menus or menu items might differ based on the system and the specific SAP environment.
So now that you’ve seen the step by step guide on how to generate documents in SAP success factors, it is very important to know the tips that will streamline your work and also help you avoid making mistakes and errors. so , let’s explore some tricks.
Tips and Tricks for Document Generation in SAP SuccessFactors
- Use Clear Placeholder Naming Conventions
- Maintain Template Modularity: For example, “If country = Germany, show clause X.”
- Use Version Control for Templates: Before making any changes, save each template
- Make Use of Permissions: Carefully grant managers or staff access to Generate Only.
Want to know what are the Functionalities of document generation software? Check out this blog to know more capabilities of document generation software.
Conclusion:
Document Generation in SAP Successfactors has been the most powerful tool that streamlines every department in the workforce today, who seek storing documents that are automating the creation of personalized, accurate, and compliant documents. From initial template setup to configuration of permission, the tool is very flexible across the employee life work cycle.
By following the step-by-step guide and applying the tips and tricks shared above, workflow can significantly reduce manual effort, minimize errors, and simplify how documents are delivered and managed.
So, businesses can guarantee policy compliance, preserve accuracy, and deliver documents effectively throughout the employee lifecycle by utilising SuccessFactors Document Generation.
FAQs
Document generation in SAP successfactors is a Noteworthy tool that helps the workforce to automatically draft employee based documents such as offer letters, contracts, promotion letters, invoices and much more by using Prebuilt templates which resonate with the employee database system.
Yes, it can be auto-sent to employees or managers in SAP SuccessFactors using document generation, which is usually used for collaboration with email services
To manage multiple languages in SAP SuccessFactors, you need to create or Initialize language-specific templates and ensure a ocation for all the dynamic content.
Steer clear of complicated formatting and large images by using lightweight templates.
Limit merge fields: To cut down on processing time, only include information that is absolutely necessary.
Reduce the amount of conditional logic you use. An excessive number of if/else rules can cause performance issues.
Aim for a template file size of less than 2 MB.
Using the data extraction utility that extracts the data that you specify, this creates essential and sequential files that you can choose which data to extract from various SAP components using DART’s default settings.

How Legacy Document Tools Crash Salesforce During Insurance Claims (And the 1-Call Fix)
When a storm hits, insurance claims explode, but so can your CRM if legacy document tools burn throu

Top 10 pdf fillable form generators
No matter if you are dealing with documents for school, money, or yourself, you will have to fill ou

What is Dynamic Document Generation? Best Methods to Generate Dynamic Documents in 2025
This blog explores dynamic document generation, showcasing how it transforms the creation of persona